The following steps are the very basic beginner starting out to learn the steps for how to use a camera. Going through them even if you are familiar with how to use a digital camera There will still be some information that may be helpful to you.
Unpack the box carefully
Your all excited you just purchased or received as a gift your first digital camera. That is so exciting. So you unpack it from the box, 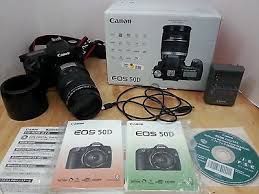 find your quick set up page in the manual and oh my there is a bit to it. You just want to get it set up and start taking photos. But wait… there are a few things that you best do first before you get to excited.
Batteries and Charger
One of the first things that you need to do is find your battery and charger. Check your instructions and then charge it up first completely before putting it into your new camera.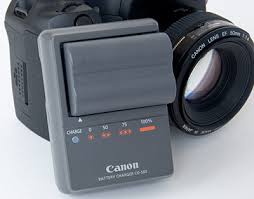
Once your camera battery is charged proceed to install it as to your instructions, being careful not to place your fingers onto the little metal connectors. The moisture and oils on your fingers can, in time, corrode the connections and the camera will not receive full power from the battery or the battery could not last as long. If for some reason you are using regular alkaline batteries again be very careful to avoid putting your fingers on the ends.
Basic menu set-up
Once you install your battery and turn your camera on usually the screen you will see will ask you to set your date and time. If you do not see it right away click on the menu button and scroll through until you find it. Go ahead and do so now.
Camera Cards
Camera cards come in a variety of sizes but the most common ones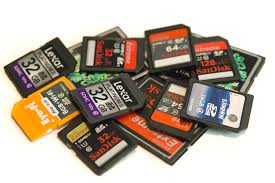 these days is the SD or Secure Digital camera memory card also there is a CF or Compact Flash also.
A very important thing to do at this point is to FORMAT your memory card, and only format your memory card in your camera. What is that you say. Well formatting your card in the camera will set the information on the card so that the camera can correctly write the data from the photos that your are taking eg. the image, that you are about to take to the camera memory card essentially the film.
If you do not first FORMAT your memory card it will still work but there is a chance that your information may become corrupt and neither your camera or your computer may have an issue reading your data, hence your photo image.
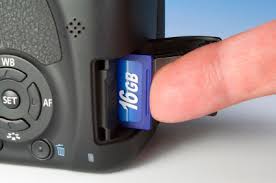 So please put your memory card into the memory card slot in yourcamera and go through your menu settings until you find the the FORMAT setting.
 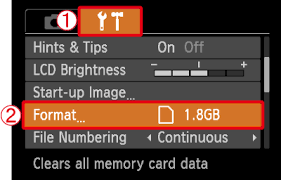 What I do as a habit is to hit the preview button, the little triangle in a circle on most cameras, and just double check that there is nothing on the card that I don’t currently want. As this is the first time you are using this card it should be blank and the view finder should show something like “no images found”. So now proceed to FORMAT your card. The menu will come up with are your sure? Do not click yes until you are sure that you are ready to format, as there is no going back once this process is initiated.
Ready to take your first photo
So now what? If you are very new to photography at this point I would start with the auto settings. 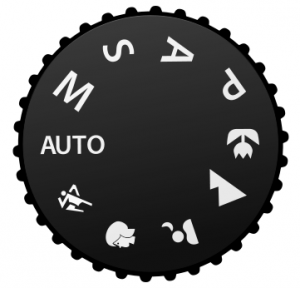 These will make it a bit easier for you to see your first photographic results with your new camera. Essentially your camera does most of the thinking about your settings including lighting, white balance and ISO. What you need to do is find your subject, frame it in, find a focus point and gently press the shutter button down. If you are a hunter think of this button as your trigger and squeeze it gently all the way down after you have first focused on your subject. Do not push it quickly as this will add shake to your camera and in turn may result in blurry photos.
Well there are still a few other things to think about here also. As you press the shutter button down  first half way with the small square in the screen on the spot ( that you want to be in the sharpest of focus) then gently press the button down half way and at this point, not moving your finger, you may wish to recompose your shot, but do not change your distance from you subject or your focus will be out and your will need to re-focus. Learn more about taking photos.
Photo review
Now that you have taken your first photo, how can you review it? Well most cameras will be set default to about a 2 second review after your take the photo, so that if you look down at your screen you can see the image very shortly after you have taken it. But there is also a button with a small triangle on it that if you push it you will see the last photo that you have taken. If you wish to go through additional photos that you have taken there is generally a button showing right left arrows that when pressed will go through the photos that have been taken and when you preview this way the images stay on the screen until you clear the screen by pushing the shoot button halfway or it may timeout if you wait too long.
I like my photo, how do I print it?
There are a few ways that you can print your photos. Firstly you can take the camera card out of the camera (first turn the power button off) and take it to any photo Kiosk, slide it into the machine in the appropriate slot select your image and click order. Your photo will be printed on a commercial printer.
Another way to print them is directly in you home printer (there is usually a card slot built in).
But before doing any of this I would first put a copy of the digital photo files onto my computer. To do this, here again there are a few options.
Most computers and laptops these days have card slots built in. So you can just slide the card into your computer. You will need to locate your card file. I suggest that you select, copy and past it to a folder in your computer and soon down the road that you back it up on an external hard drive. But for now lets continue.
There should be a basic viewer appear where you can see the photo that you took and see if it needs any editing. I will get into that a bit later, but for now admire the photo that you just took and now have uploaded to your computer. (Yes this is pretty basic stuff, but for some this may be the first time, so bare with me)
Most viewer programs will let you do some basic editing such as brightness, contrast and cropping. If you have located that feature go ahead and try it if you like.

Here are a book that you may wish to purchase down the road as you gain more confidence with you camera. I am a big fan of Scott Kelby’s unique style.
I’m a professional photographer and wanted to say that your article is clearly written and easy to understand for the beginner. I love that you have photos with each heading in your article helping your reader to visualize what he/she is doing. Starting out with DSLR photography can be a daunting task. Great niche site.
Thank you so much for your wonderful comments. I am hoping to help the budding photographer achieve better success with their photography. Nice to meet a fellow photog.
Really liked your article. It is well written and easy to understand. The photos really help.
Thank you for your kind words. I am aiming to make the basic of understanding your camera to get people started on the right track when they get that new camera home. Being excited to get that first photo.
Thanks for dropping by my site.
I know very little about digital cameras so the information you have is invaluable! I want to say you wrote the articles in easy to read, entertaining fashion which may lead me out the door to search for a camera sometime soon!
Hello Keith,
I am happy to hear that you found the information on my site informative, helpful and easy to read. Doing creative things and seeing things in a creative way is fun, and when you pick up a camera and start seeing the world through the lens you can begin to see more detail in the things around you. Let it be fun.
Feel free to contact me when you are ready to look for you new camera and I would be pleased to help you decide which camera would suit your needs the best.
Let me know what subjects your interested in photographing.
Great post. I did some photography when I studied toward my Graphic Design Diploma. It wasn’t a comprehensive photography course but enough to get the best out of images and your camera when using images in my work. Your tips helped me revisit and jog my memory since I will be using these tips when I need images for my own project. Thanks.
Hi Sam,
I am interested in Graphic Design also but have not as yet taken any courses, but I think knowing and understanding photography is definitely a benefit in designing projects.
I am glad that you finding my site has jogged your memory for photography, and if I can help you at all for your to create special images, please feel free to drop me a comment and I will be pleased to help out.
What a great and informative article. I believe with cell phones photography is becoming a dyeing art. Its cool to see articles like this that may get the juices flowing once again for an amateur photographer. My wife takes some cool pics with her phone but has been talking about buying a digital camera. I will direct her to your site for some good info. Thank you.
Yes cell phone photography makes it much faster and easier for the most part to get images but with a DSLR you have a lot more flexibility and can work with different lighting situations where your phone camera would not be able to capture images. If you have any questions that I can help you our your wife with about photography please feel free to drop my a comment.
I really loved this easy to read post it was short and sweet which is actually a good thing because you got all the right information down that a beginner would need to know. I love photography yeah, I am no expert or anything I do know the basics and how to edit. It would’ve been nice to find this article when I was first starting out then it would’ve helped a lot more but hey everything happens for a reason right?
The two ways I get my message out is through my pictures and then I translate through my words which I really do find taking Nature/ landscapes is my go to since that is where I like to be most. I will have to save your blog because I can already tell I will get some good information out of your blog.
Keep on spreading your word and helping other aspiring photographers “perfect” their craft thank you for this,
Matt
I like to keep the information short and easy to understand, and I am glad that you have found the quick start tips helpful.
I to like to get out in nature and capture what I see through my lens, it is very relaxing and enjoyable and great to look back and remember the peacefulness captured. on my camera.
If you have any suggestions for topics that interest you, feel free to drop them in the comments.
Monika,
I have a digital camera and I do believe I need an up to date one mine has been around now for approximately 10 years, do not get me wrong I like the images and photographs it takes but since it has been so long figured possibly time for a newer model.
I am not a professional and would love if you could recommend a fairly good camera that I can purchase for images and other photographs for my business.
Thank you,
Susan
Hello Susan,
Thank you for checking out my site. Here is a link to an article I wrote to help you decide on what camera would work best. Entry level DSLRs have many helpful and teaching features now and you can start to get great images out the door
digital camera https://myphototidbits.com/the…
Also a quick reminder to format your memory cards in camera before you begin to go out to photography the first time.
Check out this link that explains why https://myphototidbits.com/imp…
If you have any questions I would be happy to help you, just leave your comment below.