The best digital slr camera photography settings
Digital camera shooting modes
So what is the camera mode dial? It is the place, the dial or screen that you set your camera to for the type of image that you are wanting to take. Some settings will assist while some you will have full control over what the camera will do.
So lets take a look at them.
Auto or Green Square

For example if your new to taking photos with a camera that gives you these options, a basic place to start is to set it to the “auto” setting.
For most, this is a good place to start then you will concentrate more on the subject matter and the composition you are trying to photograph, and less on the tecky stuff the camera does.
Just note that in the auto or green square setting you have no control on the settings the camera basically says “I see what you want a photo of and I will set the camera the way I think will work best”
It will set things for you like:
- Aperture
- Shutter speed
- ISO
- and weather you need the flash to come on or not.
It is great to use when just starting out and learning about your camera and you just want to get that quick shot, capture that quick picture when you don’t have the time to fiddle with settings.
This automatic mode will choose the settings for you based on the scene that is being photographed. If it senses low light, it will choose to open the aperture and slow down the shutter speed, and if it is bright outside in turn it will close the aperture and speed up the shutter.
All you will be able to do is focus on your subject and press the shutter to take the photo. In the auto mode your camera will decide when more light is needed and may set the built in flash to fire.
So lets go other some other digital camera modes.
Lets start next with the Program setting the “P”
Once you get a bit more comfortable using the auto and want to start taking a bit more control over your photography move your dial to the “P” or program setting.
Here the camera will still do some of the work but you can over ride some of the things that it wants to do for you.
So if you would like to choose to adjust some of the settings yet let the camera take care of choosing your aperture and shutter speed. This will give you some more creativity with your images and get different variations of light and depth of field.
You will be in control of when to use additional flash and the focus in this mode. You can keep the correct exposure and set a lower aperture or shutters speed depending on your subject.
A note, with lower aperture speeds, below 1/125th, seen in your display as 125, it is recommended if the situation allows, to put your camera on a steady tripod.
A small tip
When you are trying to focus on a subject and the auto focus is not focusing on what you want it to, move your camera to center the focus location square on your desired focus point or area on the subject.
Press your shutter button down only half way as for the camera to focus, with out releasing your halfway down shutter button hold, move your camera back to re-frame your composure to where you originally wanted your image framed and click, gently push, the button down completely to take the image.
More quick helper camera settings
Portrait Mode
This automatic mode usually looks like a silhouette of a lady, sometimes with a hat, sometimes not.
So in the portrait mode setting, this is for when you want to take portraits or a group shot. This mode will soften the skin tones, and it will blur some of the background. This blurring of the background details will bring your subject away from your background to make it more prominent then the background.
Close up or Macro Mode
This mode is generally depicted by a tulip.
This automatic close up mode is generally best used when you want to get up close to something, generally small, things like bugs, flowers, butterflies, or any miscellaneous smaller items or objects.
This mode works best when shooting from a tripod, because any slight hand movement could cause your image to turn out blurry. If you do not have a tripod you can set your camera on a steady flat surface.
If you are still having some blurriness, or your camera will not focus on the subject, this could be because you are to close to your subject with the lens that you are using.
You want to have plenty of light when taking macro shots, as you do not want your flash to auto-fire.
A small tip
You can override your flash from firing automatically in your set-up menu, check your manual to help you do this.
Landscape Mode
The landscape mode on the dial usually looks like a mountain.
This automatic landscape mode, as the name states, is generally used when you are taking landscapes and scenery images.
This is the perfect setting when you want to get the “whole picture” even if it is not necessarily a landscape. It will keep everything near and far in focus.
It can also add more vivid blues and greens to your scenes, of course depending on your camera.
In this mode generally the on camera flash will not automatically or accidentally go off and illuminate your foreground. So this mode would also work well for taking night landscape shots.
Sport or Action Mode
The sport mode is usually shown with a person running.
This automatic sports or action mode will set the camera to help you capture and stop-action in your subjects.
This includes things such as sports, children playing, moving objects or animals.
What I like, is it also helps stop movement or action when you are a bit shaky or fighting wind or even if you are in a moving vehicle.
The sports mode increases the shutter speed, thus allowing for the subjects in the scene to become frozen in their movement. Stopping movement in sports games, moving water, capturing animals at play, birds in flight.
Using this sports mode it is also a good idea to set your shutter release to multiple shots. That way you can just hold the button down once focused and framed and capture multiple images of the movement, only seconds or split-seconds apart.
Check your manual on how to set your camera to multi-shots.
So these are the basic and most common automatic mode settings that most cameras have. Lets now move on to some more advanced settings and their basic uses.
Aperture Priority Mode “A” or “Av”
This mode, depending on the make of your camera, can be shown as an “A” or Av. Av being short for aperture value.
So when you are more comfortable and want to be in control of your aperture and depth of field, then aperture priority is a good choice. (My camera stays in aperture priority a lot of the time).
So turning your dial to “A” or “Av” will allow you to set manually your depth of field, how much of your background will be in focus and your camera will set the best matching shutter speed for you to achieve this.
Letting you increase or decrease the focus on the background of your image details, as well as letting your have both in focus if this is what your choose.
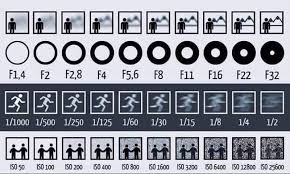
To increase your depth of field and allow more of your image to be in focus, you need to make sure that you change your aperture to a larger number, this will create a smaller aperture opening.
To decrease your depth of field, and which will cause some of the objects in your image to be out of focus, you would set your aperture to a smaller number, which will create a larger aperture opening.
A small tip
- The bigger the aperture number the smaller the opening in the lens, the greater depth of field
- The smaller the aperture number the larger the opening in the lens, the smaller depth of field
Take a look at the following chart to help you understand the differences.
Shutter Priority Mode “S” or “Tv”
This mode, depending on the make of your camera, can be shown as either “S” or “Tv”. Tv being short for timed value.
So moving your dial to “S” or “Tv” is the opposite of aperture priority in that you decide if you want a fast or a slower shutter speed and the camera will choose the best aperture for that shot.
You can use this for stop-action or blurred motion shots. If you slow down the shutter speed on a moving subject you can blur the action, be creative by showing motion in your photograph. Sometimes also call motion blur.
Using both the aperture and shutter priority modes will allow you to move out of the box, so to speak, and experiment, and become more creative with what you can capture with your camera.
Thanks for sharing this. I have an SLR and I haven’t worked out most of the settings except for auto. Haha. Cheers!
Well maybe with some the information here you can venture out of your comfort zone and experiment.
Its fun and only costs money if you decide to print… so have some fun experimenting with the other settings.
My wife has learned a lot about cameras from a friend of her’s growing up and I’m sure this isn’t new to her, but I found it to be very informative. I honestly had no idea what each setting did technically, just a broad idea, and some I didn’t even know that. Thank you for the information on the camera settings. I’ll have to try them out when my wife next lets me try out her camera.
Yes it is definitely fun to experiment. And one gets so use to using one particular setting because they know what the camera will do. I am trying to help people get out of the slr camera comfort zone.
So grab that camera and experiment with some of the other settings and have fun.
I like taking photos but I am pretty much an amateur so I usually just leave it on auto. So I appreciated you discussing each of these and explaining all about them.
Thank you for explaining aperture. I had heard the term but knew nothing more about it. I will keep this guide as a reference. Will be interesting to see how I can use these tips to take better pictures.
Thanks,
Owain
Hi Owain,
Learning about how the various setting on this dial work, can help to take the stress out of getting those shots you want. I find that if you get a good understanding of these setting and how your camera reacts when using them, you can add your creative eye and you will be producing some amazing photographs.
Quick easy to read references when your out shooting can be very helpful.
Come back and share and feel free to ask questions anytime and I will help.
Thank you for your explanations of the mode dial. Simple yet quite detailed. This gives me a reason to stray from AUTO. Contains a lot of information. I have bookmarked your site for future reference.
Yes we can get caught up in the auto green square and just take a picture. But once you begin to experiment and stray away once in a while, you will find out what other creative and artful images you can create.
Please check back and feel free to ask questions and I will help.
Glad I found you. I sell stuff on Etsy , eBay and Craigs List . Taking a pic that is not just bad is a problem. Have a decent camera but never really knew what to do with all them settings and the auto is just not good for in the house because of lighting. Also have a LG G4 phone that is supposed to have a real good camera. Mine must be defective.
Any way next time I have to shoot some pics I will be back to study up
Hi Marcus,
Right off the bat a suggestion I can make for you to improve your product photography is look at your light. Strange to say, yes. Natural light is easier to photograph items in. You can set up on a table near a window or sliding door on preferably an overcast day and this will help but not in direct sunlight as you will get nasty hot spots (too bright) and blown out sections (way to many shadows)
Depending on your items size you you can make yourself a simple white background out of poster paper or even draping a white table cloth and placing your items in front. Do not use a flash on any shiny items rather if you are not getting enough light you can shine a light at the ceiling to give you some more light in the area that your are shooting in.
I hope this helps you some.
Please let me know how things go and feel free to contact me if you have more questions and keep checking back as I will be constantly adding more information to my site.