
Lets talk photo composition
Be creative and take charge of your photograph.
Take it on purpose, after all it is your shot.
But there are a few basic guidelines that you should follow.
One of these guidelines is the “Rule of thirds”
The definition of the Rule of thirds according to Wikipedia is:
The rule of thirds is applied by aligning a subject with the guide lines and their intersection points, placing the horizon on the top or bottom line, or allowing linear features in the image to flow from section to section.
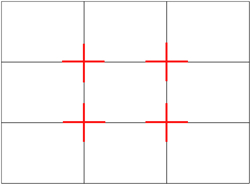
That’s quite the mouthful. Basically you divide your image into 9 sections using two horizontal and two vertical lines making a grid. You create interest in your image by placing your subject in or very close to these intersecting points. Also placing horizons at the upper or lower horizontal line locations.

As in this photo you see the horizon was placed lower third, in this image.
Just a note when shooting horizons and water, make sure they are level.
Choose one main subject, and only one but have your image tell a story about your subject.
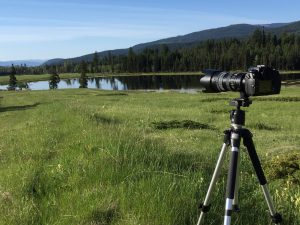
Here my subject in this image and it is my camera on the tripod telling the story of what I will be photographing. The lake and it was a wonderful sunny blue sky day. This is what I wanted to say and convey.
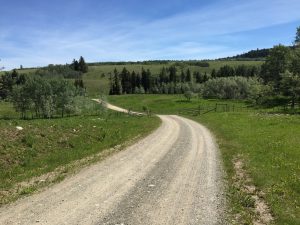
Here my subject is the road and it opens up a story about where the road is going to, what is beyond the rise? In addition it describes the lush green grass and clear sunny day with just a wisp of clouds.
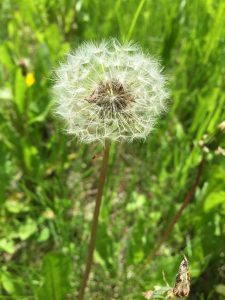
So with this dandelion it is almost centered but the subject – the seedy flower – is in the top third of the image.
Look around your subject for distracting or odd things in the back or fore ground
What I am talking about is scan the background for things that do not look right with your subject.

To me the fence and rock and the hose that is lying on the ground to the left is taking away from the subject of the kayaks. It is drawing away my eye.
The other thing to watch out for is when 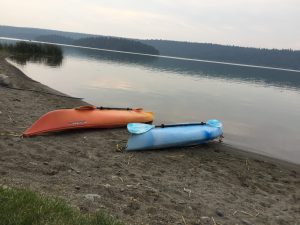 you take photos of any subject and you have water, especially a lake, river or ocean, be very mindful of tilting of the water. All waterways, with the exception of waterfalls, are all level. So watch for this in your subject and in you backgrounds that include waterways.
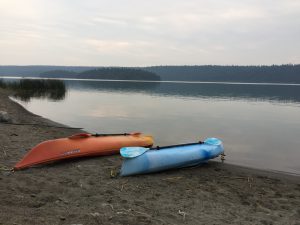
So I think this shot is getting better, the lake is near enough to level and the fence and post are out of the scene. I think the rock is now ok in the scene.
By changing the height at which you aim your camera at your subject, changes the perspective. This one I am nearly level to the kayaks. Looking in the background the lake is level, unless you knew about the hose lying there it is barely visible, and I think the rock is also ok. For cutting the other kayak, the image suggests that there are at least two kayaks on the beach, but the focus is on the red one.
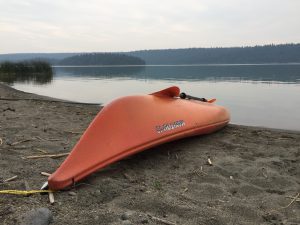
So for this last image of only the one kayak also works for me. The background of water is level, but this time I changed my position enough to crop out the fence and the rock in the camera and this makes this one red kayak the main focal point and it says either “Waiting to go out again” or “We had a good kayak today and are ready to go out again soon”
Each person will read their own story in the photos that you produce just as you see and read a different story when you compose and shoot those images.
Be mindful of your fore and backgrounds. Other things to watch for is things that totally do not belong in the scene.
Before I took the first image I moved a dog toy that was laying in front of the kayak. It is an automatic thing for me to do to scan the scene first, especially if you have time and your subject is not moving.
Sometimes, well it is more important to get the action shot and then you can remove some things with editing software.
Hope this gives you some helpful tidbits on some composition things to watch for.
Feel free to drop me a note if you have questions or comments or have a topic you would like me to cover.
Hi
Thanks for the tips.
I bought myself a sony bridge camera about 4 months ago & haven’t really used it as such.
I live in the UK & often go to the Lake District After reading this, I will definitely take on board some of your tips & try them out for myself.
Thanks again
Paul
Hi Paul,
The Sony Bridge camera is quite versatile and you can shoot from macro to deep zoom with one lens. My tidbits do apply to fixed lenses also because generally the mode dial is similar. The basics of photography work the same regardless of the camera.
Thanks for your comments. Please feel free to drop me a line if you have any questions and I will do my best to help you out.
Happy shooting.
Very interesting articles on how to make good photo shoots and what makes the photos really good.
I appreciate you comments and if you have any questions regarding photography please leave me comments and I will help you where I can.
Hello! This was such a fun article to read. Thank you for writing it in such an informative way. Now I know to really align my photo with my intention. It really makes a difference. I am drawn to the last photo of the red kayak. It seems to tell a very different story.
Great job! Can’t wait to try my next photo. ariel
Thank you Ariel for dropping by my site and your kind comments. Once you start to think about the rule of thirds you will begin to see the technique in photography and you will also see it in art.
Having the three images in a row you can definitely see a difference but it is all in the person observing as everyone sees differently.
If you have any questions about photography feel free to drop me a comment and I will do my best to help you out.
I’m not much of a photographer but as an artist this gave me some perspective on what makes an image look good. Especially since I’m currently practicing on landscapes. This was very informative and I very much enjoyed it.
Hi Bree,
These composition ideas can also transfer to art as you want to lead the viewers eye through the image and you dont want them to leave so you want to give them many lines for them to keep their interest and keep looking at your image or art. I am happy that you felt that my article was informative. Best of luck in your art.
Feel free to drop by anytime and check out new articles.
Wow. Now I can actually realize what the grid on my camera is used for . Thanks for sharing Bree.
There so much to how you position your shot and will be more mindful from now on.
Yes I had the same reaction one I finally understood how placing subjects in different areas of the frame rather that in the center all the time gave a different feel to story of the image I was sharing.
Thanks for checking out my site and feel free to add any questions you may have and I will help out where I can.