
Different settings and buttons, what do they do?
So with the variety of different digital camera models and brands on the market the basics are the same just where the buttons are, and the menus are, differs. We are going to take a look at a Nikon d5300 just to give you a better idea of what does what.
Below we will work on helping you to better understand your camera
So let’s start on the top of the camera there you will see the buttons generally used most often and ones that you wish to have at easier access.
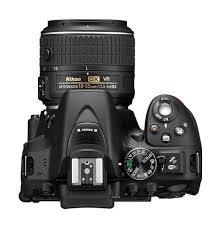
Power switch, as stated this is the button of switch that turns the camera both on and off. With Nikon in particular this is a ring button surrounding the shutter release button. This makes it easier to turn on the camera faster and having your finger right there to take a shot.
The shutter release button which when pressed halfway focuses and depressed completely takes the image. Generally I have only seen this button in the top right hand side of any camera.
Exposure Compensation button is used to add extra light or take it away without changing your aperture setting. Generally you would hold down the button and roll your adjustment wheel to add or take away steps of light.
Mode dial will allow you to set your desired shooting mode. The standard modes include “P” program you can adjust your flash use but the camera will set aperture and shutter speed, “S” Shutter priority, where you set the desired shutter speed and the camera will adjust your aperture setting. “A” Aperture priority, where you set your desired aperture and the camera will set your shutter speed, and “M” manual mode, where you are in control of both the aperture and and the shutters speed. Also most entry level DSLR cameras will include a fail-safe or green square for full auto. With this setting all you have control over is your image and how your image is framed. The camera will even decide when it thinks that you need the flash to fire.
Then in addition to these standard settings the mode dial also generally includes some automatic settings which are great for when you want to capture a certain image style without worrying about settings. For example sport (action or movement) landscapes, portrait and macro or close-up photography. Some cameras can also have a flash-override on the dial as well.
Live view switch “Lv” in some cameras it is on the top and others you may find this button on the back. Pressing the Live view button will block the optical viewfinder meaning you will no longer look through the lens at the back and will allow you to see your image on the LCD screen at the back of the camera.
Command dial lets you adjust shutter speed and when you are in aperture or shutter priority settings the command dial will change the values. Also when holding down the exposure compensation button then moving the command button in either direction will change the amount of compensation achieved. The command dial can also change menus when the menu button is pressed in addition to changing various other setting including scrolling through different menus.
Video start button generally has a small red dot on the button signifying it is the record start button. This button is only used to start and stop video recording done with the camera. On some cameras that do not have the red dot button, they will instead have a button sometimes on the on off switch button that has an image of a video camera on them, this will put the camera in video mode then you would press the shutter button once for on and again once for off.
So now let’s look at the lens and the side of the camera

Flash Button can be controlled by you in the advanced modes (eg. P,S,A, or M) this button when pressed will pop up the flash and the camera will charge it and be ready to fire fairly quickly of course depending on how well your camera batteries are charged.
The flash button symbol (universal on all cameras) looks like a lightning zigzag and is generally located on the side of the camera near the top where the flash will pop up. It can also have an exposure compensation symbol meaning that you can change the amount or power of light that it will emit when fired letting your have control of how bright you want the flash to make your image. This can be changed by pressing the flash button.
Function button are a useful and helpful because you can program them to most what every function you use the most that may be hidden in a menu setting. I like to set mine for HDR or multiple exposure modes that makes it faster for me to find them when I wish to use these settings, and can find them quickly.
Lens release button as stated will release the lock that holds the lens to the camera. This button only needs to be pushed when removing a lens. When putting on a lens by lining up the white dots on the lens to the white dot on the camera and depending on the camera it could be either a right or left turn thread to mount the lens and when you hear a click it is generally on properly.
Just a tidbit about mounting lenses, do not force them if you are unable to turn the lens more that a small amount check that you are lined up with the dots and that you also have the lens perfectly level to the camera. There is generally a notch the lens will slip into if you are lined up square then you know that you can turn to lock the lens on.
Now the lens
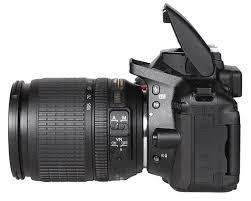
The zoom ring. Depending on the lens but most have a zoom ring, which is generally the wider of the two rings on the lens and as stated this is where you can adjust your zoom in or out by turning the ring. Different brands of lenses zoom in and out either right or left.
Focus rings on entry level cameras are generally a smaller width. Rotating this ring will adjust focus but be careful only turn this ring if you are set for manual focus.
On some of the professional lenses this focus ring can both focus automatically and can be over rode manually as well when set to do so.
Drive mode button gives you the control over how many shots the camera will take at one press of the button, either a single image or continuous shooting and you can also set the self timer or countdown timer. This button can be located in various locations depending on the camera used, but the symbols again are universal so you will just need to locate them on your particular camera. In some cases you may need to change the settings within a menu.
Let’s move to the back of the camera now
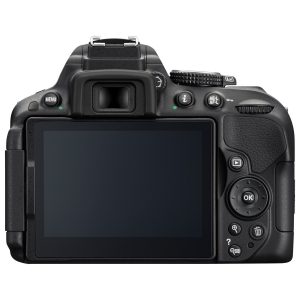
Generally there can be a raft of buttons on the back but with a few explanations of their use it should help you to understand their uses.
Menu button will bring up the camera’s menu and many of its adjustable features. Some of which include image quality and size, date, time and many other adjustable settings in your camera.
Just a tidbit, some things will not be accessible to change when you have the mode dial set to the green square (auto) setting.
Diopter adjustment dial lets you focus the viewfinder. If you wear glasses you can adjust the diopter for your viewing eye so that you do not need to wear you glasses while shooting. In addition if you are looking through your lens and focus using the auto focus feature and your image looks blurry chances are that the diopter dial may have been moved inadvertently, so check this before panic sets in that your camera’s focus is off or there is an issue with your lens.
The info button when pressed will travel through the different information settings on the LCD screen so that you can make adjustments using your command dial or multi selector, depending on the camera model.
The auto-focus/auto exposure lock button when held down will lock both of those settings so that you can re-frame you image and the focus point and exposure will stay the same in the sequence of images. This is generally used more once you become a more advanced photographer.
Image playback button as described is how you can review on the LCD screen the images and videos that you have just taken. Pretty self explanatory.
i button is a Nikon thing. On other cameras it can be seen as a “Q” designation. But essentially pressing this button brings up a set of functions on the back LCD screen that do not have a dedicated quick access button somewhere on the camera. Such settings as ISO, white balance and some of the drive mode settings.
The OK button is used generally for selecting a menu item but on some cameras it can center the spot focus auto-focus point within the viewfinder.
The multi selector , usually a four sided button can have a different name on other cameras but this button in general it can move you through your menus.
It can also let you move the spot focus point within your screen so that you can change what area in you image you wish to have in the sharpest focus and not necessarily being in the center of your image.
Magnify button will magnify your image in the playback mode so that you can take a closer look at your image for things like point of sharpness and eyes open etc. By clicking numerous times it will take you in closer. Also you can use the multi selector button to move around the image.
De-magnify button as stated will reverse the stages of magnification during the playback mode of viewing the images that you have taken. Again you can click this numerous times and it will de-magnify your image in steps.
Delete button marked on most cameras with a small longish triangle, will delete your images in camera. But generally you will need to either press it twice or press the OK button to complete the delete.
A tidbit here. I do not recommend that you do any deleting of images in camera as you will see more once the images are viewed on a larger screen with your computer. I say this because a friend of mine and I were out shooting one day and she was all excited to get a shot of a deer and was previewing as we were talking and she said oh that one is not good .. delete.. We continued to talk and she was looking through deleting various images that she was not happy with and unfortunately the image that she really liked and was the best in focus she inadvertently deleted and in turn was very disappointed. Because once gone off your card they are gone. So think twice before you delete images in camera.
So there you go, a bit of an overview of the buttons and their functions of your basic modern DSLR camera. Hopefully this will help to make things a bit clearer when you go out to shoot.
These camera’s can look very complex but with a bit of practice and understanding of what does what, you will become more comfortable with these buttons and functions. For the most part you will more than likely not use many of these buttons but its good to know what the do. As long as you know where the basic dials such as your mode dial, command dial, playback and the shutter release button is, you will be well on your way to taking some amazing images.
I have thought of getting a nice camera. But I was worried I would spend a lot of money and then not know how to use it. This has helped. Do you have any suggestions on a model of camera for a beginner? I don’t have a lot of money to spend. I would like to get into photography.
Hi Jason,
Well being on a tight budge can work also. I would suggest that you can look into purchasing a used camera. That would give you more bang for you buck.
The ones that I like are the Canon Rebel series either the Rebel T3, T4 or T5 would be a good choice in addition in the Nikon system my recommendations would be the Nikon d5200 or d5300 these cameras would be a suitable beginner camera that you would still be able to grow into as your skills grow. Check out this used camera dealer
Wow, that’s a lot of buttons on a camera but you simplified this for this camera. Is this just for Nikons? I don’t have a camera like this or ever have but I would think it takes much better pictures than a basic camera. Is this for professional photographers or just the button location for camera’s in general?
I based this on the Nikon but every DSLR camera has similar button uses in general. Checking your manual will give you the locations on your camera if using a different brand of camera.
If I can help you at all with any additional information, please drop me a comment and I will help with any questions you may have. Thank you for dropping by my page.
I think you can use more pictures!!! The camera itself isn’t all that interesting to look at, and you need to show your stuff. I love this, close to my heart for my daughter. She is wanting to do photography, and I think this information can be helpful for many people.
Thank you for the site!
Best,
Nurse Becca
I do need to dig into my photo library and spruce up this page. I am happy that you have found this information helpful. Encourage your daughter to use her creativity and go out and photograph even from the simplest of subjects you can create amazing images.
If your daughter has any questions I could help with please feel free to drop them in the comments.
Greetings Monika,
This article was really clear and helpful for understanding some basic camera buttons and dials. I have an old Canon EOS Rebel that I pull out every now and again and it’s super helpful to have a reference for the buttons/settings that a casual photographer can understand. Half go the battle for a beginner photographer is simply learning about your camera and its features, then gaining experience to really understand how each different setting works. I also appreciated the suggestion on waiting to delete any photos until they are viewed on the computer because it definitely can change what the photo looks like and how you see the image. Thanks for a great article! This has got me excited to pull my camera out and go take some photos soon!
Cheers 🙂
I am glad that this article has moved you to bring your camera back out. The Canon Rebel series are great cameras. I am trying to share and reference in an easy to understand way so that people will get out and enjoy taking creative images. Waiting to delete images is such a good idea because when you take an image and you check the camera’s small screen you see it in a different way than when you see it on the big screen.
So keep the camera close by as you never know when you will see a great subject.
If you every have any questions that I can help you with please feel free to add it to the comments and I will help you out.
Happy Snapping
Hi Monika
A great site and I am book marking , I bought a 5100 Nikon, and well, have used it very little, my children have at times, but not me!
I would like to change that and your post is so informative about how to use this camera, hopefully there is not too much difference between a 5100 and 5300, is there?
I had such great plans when I bought my camera and there they are, still waiting for me, thank you.
Michele
Hi Michele, Both the d5300 and the d5100 are fairly similar and if you are just starting out using a DSLR then either one that you get great images with.
Here is a post that I think will help you to be a bit more comfortable with you camera. take a read
https://myphototidbits.com/how…
Now the biggest thing is to just get out and experiment. With it being digital now vs film is that if you do not like it you can just delete and you are not wasting film.
If you have any questions that I could help you with please feel free to add to the comments and I will be pleased to help where I can.
Happy snapping.