This is a question I was asked a while ago. I spoke with a lady that just recently received a new SLR camera (Single lens reflex) one that you can change your lenses and has many options.
Well she went on a holiday, took many photos and once she was home and looked at them on the computer screen she was a bit disappointed as what she thought she captured clearly was actually out of focus. Her subject, which generally was a family member, was in a hazy focus in most of her images. This can be a bit disheartening when your excited to be using a BIG camera for holiday photos.
So let’s look at this a bit more and why this can happen.
Camera’s have a variety of choice for focus. And learning them and how they affect your image will help to improve the outcome of what you plan to take.
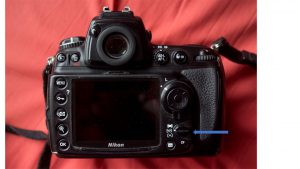
Below is the back of a Nikon SLR there is a selector switch, other makes may have a different way to change your focus points. You can also go into your menu and find it there also (check your manual to find out how) but the little switch makes it quicker on this particular camera. Most camera’s have similar options.

There are a couple of ways that your camera focuses and for the most part cameras are at the automatic grid focus point, which essentially means that the camera will take a few points at different distances from the lens and find an average to focus on.
So to have a better chance to avoid this go into your settings menu or some cameras have a dial or button, as noted above, and change your focus to “Spot focus”, which I myself prefer most of the time.
This is generally depicted by only one focus square or dot on the screen when you either look at the back of your camera in live view mode or when you look through the lens you will see a square or even a dot depending on your brand of camera and model.
It is generally set in the centre of the screen but you can move it around to where you want your subject or image to be the sharpest. This can be done by either moving it in the camera or moving yourself with the camera and line up the square to where you want to focus and then frame your image.

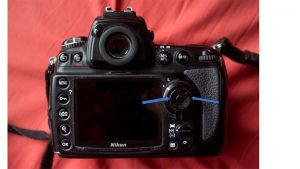
Using the paddles as shown either the right or left will move the focus dot or square in the screen right or left and as such will change where the camera will hold the focus point.
A tidbit about the Nikon camera, if for some reason the focus square does not move when you press the arrows on the paddle button, gently press the shutter button down halfway and then try it again.
For people and animals, this is generally on the eyes, the eye closest to you or just at the bridge of the nose. When you look at an image and there are people or animals in them you generally focus on the eyes first and then you see the rest of the image story, for me anyways.
Next to hold your focus point in camera to just before you press the shutter button down, here are a few tidbits to help you out.
Now you have the subject within your image that you wish to have in the sharpest focus under the little dot or square. You click the button and look at the playback screen and it is not that focused. Why?
Well if you quickly pressed the shutter button down right after lining up the dot or square the camera may have been on a different spot or you may have some camera shake or movement, there are a few possibilities.
Once you have found your subject in the image, lined up the spot focus square or dot now you gently push down the shutter button only halfway. This will get the camera and lens to focus on the spot you wish to have in the sharpest of focus. Once you have this then if you wish to, you can now re-frame your image, but remember to leave your finger holding the shutter button halfway down to hold the focus point or you will loose the spot of focus that you just chose. If this happens you will have to start again and refocus on the spot, re-frame and now you press the shutter button all the way down gently and the image will be recorded.
It seem like a lot to remember and do but it becomes second nature once you practice this. And as a result this will help to improve the sharpness of your images.

There are also a few other settings that can affect sharpness of the image and depth of field and I will go into that a bit later.
For now use these tidbit in the “auto”, “P” or program settings and your scene settings on your dial.
Please share and comment if this has helped with image sharpness and also if you have any questions, comments or have a hint that will assist new photographers, please feel free to share below.

Interesting piece Monika. Cameras are pretty technical, to say the least, and require a small investment of time to learn. You really describe how to get the focus right. Thanks for this informative piece!
Hello Pavlos,
Yes cameras can be pretty technical, but you can also get some good results by even just learning the basics and that will give you a place to start from and build your knowledge from.
The investment all centers around what features you are looking for. But I suggest if you are quite new to SLR camera’s start with a good basic one and once you learn more then you can upgrade.
If you have any questions in the future please feel free to contact me here.
A really informative post. Thank you for sharing some experience. I will start practicing some of those tricks.
Thank you for your comments and feel free to check back to check out future tidbits about photography. Feel free to contact me here if you have any questions.
Hi, great post.
Being a novis Photographer myself, this article would be useful for anyone starting out in the digital slr world.
If your a Nikon owner this post would defiantly help you along the way.
Keep up the great work.
Thanks Darryl,
Thank you for your kind comments. Nice to hear from a fellow photographer. I am hoping to help aspiring photographers to learn more about their camera’s so that they can get better results in the images they seek to capture. Feel free to drop me a line here if you ever have any questions and I will do my best to help you out.
I have a nikon so I love reading about nikon! I sometimes do have trouble with my photos being out of focus. Do u have any advice on how to take clear pictures of food? Sometimes I have to be quite a ways off from my food that I wanna take a pic of in order to focus. If I’m too close the whole picture is just a blur. If u have some advice I’d love to hear it:)
Hi Justina,
Taking food photographs can be a bit of a challenge to get the angle and focus point on. The distance you need to be away from your dishes with your camera will vary by the lens you are using and where you wish to have the main focus on. Say if you are using a 70-200mm lens you would need to be farther away from your subject then if you were using a 50mm lens. Each lens has there own minimum focus distance. So if you are using a lens with a long focal length you would need to be farther away from your subject before it would come into focus. I would set my camera to Aperture priority and also I would check that the camera is set for spot focus, that way you can pinpoint you focus point better, the bottom of the three as I show on the above image in my post.
Please add to your comment with the lenses that you are using and I can give you some better tidbits and suggestions that will help you achieve better images.
Great post! I am notorious for having blurry photos because I lack patience to stand still and get a good shot! This has been a very helpful article, and I will be referring to it as I look at new cameras.
Thanks for checking out my page. Patients is a big part of achieving clear photos and just by learning and understanding a few different points and functions of your camera will definitely help you to achieve it. Feel free to contact me here if you have any questions or are looking for any suggestions about camera settings or camera questions in general and I would be pleased to help you with them.